The Joriseen Hike near Davos is one of the most underrated mountain walks in Switzerland. By doing this hike, you’ll enjoy droolwrothy views of a group of green-tinted Alpine lakes (known as Joriseen), surrounded by the snowy Swiss Alps.
In this guide, we’ll outline everything you need to know about this hike. Of course, this will include details about reaching that magical viewpoint (Jorifluelafurgga), where you can enjoy the best views (and take the best photos) of the lakes.
Table of Contents
What Is Joriseen?
Joriseen (AKA Jöri Lakes) is the name of the collection of Alpine lakes fed by the (sadly) retreating Jorigletscher glacier. The lakes are located near Davos in the canton of Graubünden in eastern Switzerland.
Despite their outstanding natural beauty, the lakes remain, relatively speaking, a hidden gem. That’s because most tourists don’t visit the Davos area of Switzerland, opting for the most touristic spots in the western Swiss Alps.
To see the lakes, you’ll need to do the Joriseen Hike! Below, we’ll look at the trail specs of the hike.


Joriseen Hike Details
- Type: Loop
- Distance: 11km
- Time: 4–5 hours
- Accumulated elevation gain: 830m
- Difficulty: Hard
- Trailhead: Davos Wägerhus
- Parking: Parking Wägerhüttä (Google Maps)
- Map: AllTrails
Travel Insurance


Don’t leave for your trip without booking travel insurance. We all know accidents can happen and having Heymondo travel insurance could save you thousands of dollars if something goes wrong. Click the button below to receive a 5% discount!
Joriseen Hike Map
Here is a map of the circular hike. I highly recommend downloading an offline version of the map before you set out, as you’ll encounter poor reception during the walk.


How to Get There
Before we cover more details about the hike itself, let’s look at your options for reaching the Davos Wägerhus trailhead.
The two main options are driving there yourself or taking a bus.
Drive There: Joriseen Hike Parking
Driving to the trailhead is by far the simplest option. There is a large car park (Parking Wägerhüttä) along the Fluela Pass (Fluelapass) located next to the trailhead. From Davos, it’s about a 20 minute drive away.
Beck and I hired a car for our trip to Davos. Unfortunately, Beck was working at an event in Davos. So, I drove to this trailhead and hiked solo!
Car Hire


If you don’t have your own car, you should hire one using Discover Cars. Personally, we use Discover Cars and highly recommend them for finding your ideal car hire at an affordable price. Booking online is super easy and the free cancellation policy is great.
To find out more about renting a car with Discover Cars, read our Discover Cars review and Discover Cars Insurance review.
Bear in mind that, despite the large parking area, it fills up on weekends and during the summer. I arrived around sunrise, and about 10 cars were already there. When I arrived back after the hike, around early afternoon, the car park was full. This was on the weekend in October.


Public Transport: Bus
If you don’t have a car, another option to reach the trailhead is to catch a bus from Davos. Conveniently, the Wägerhus/Abzw. Jöriseen bus stop is located right next to the trailhead.
As I drove, I don’t have any personal experience catching this bus. From what I’ve read, the bus only runs between Davos and Davos Wägerhus a few times a day. So, this option for trailhead access is far less flexible. But, at least it’s still an option!
To help plan your journey and for more information on departure times and costs, head to the bus’s website (PostAuto) or use the SBB mobile app.
Trail Highlights
Here, I’ll cover the main highlights of the Joriseen Hike. I won’t bore you with a tedious trail description or any exhaustively long anecdotes. I’ll simply highlight the main points of interest along the walk and show you photos to hopefully inspire you to do the hike.
Fluela Pass
With that said, the first major highlight of the hike is Fluela Pass. This is the scenic mountain pass that you’ll take to arrive at the trailhead. As you ascend the initial section of the hike, you’ll almost immediately enjoy stunning views of the snowy Alps overlooking the high alpine road.


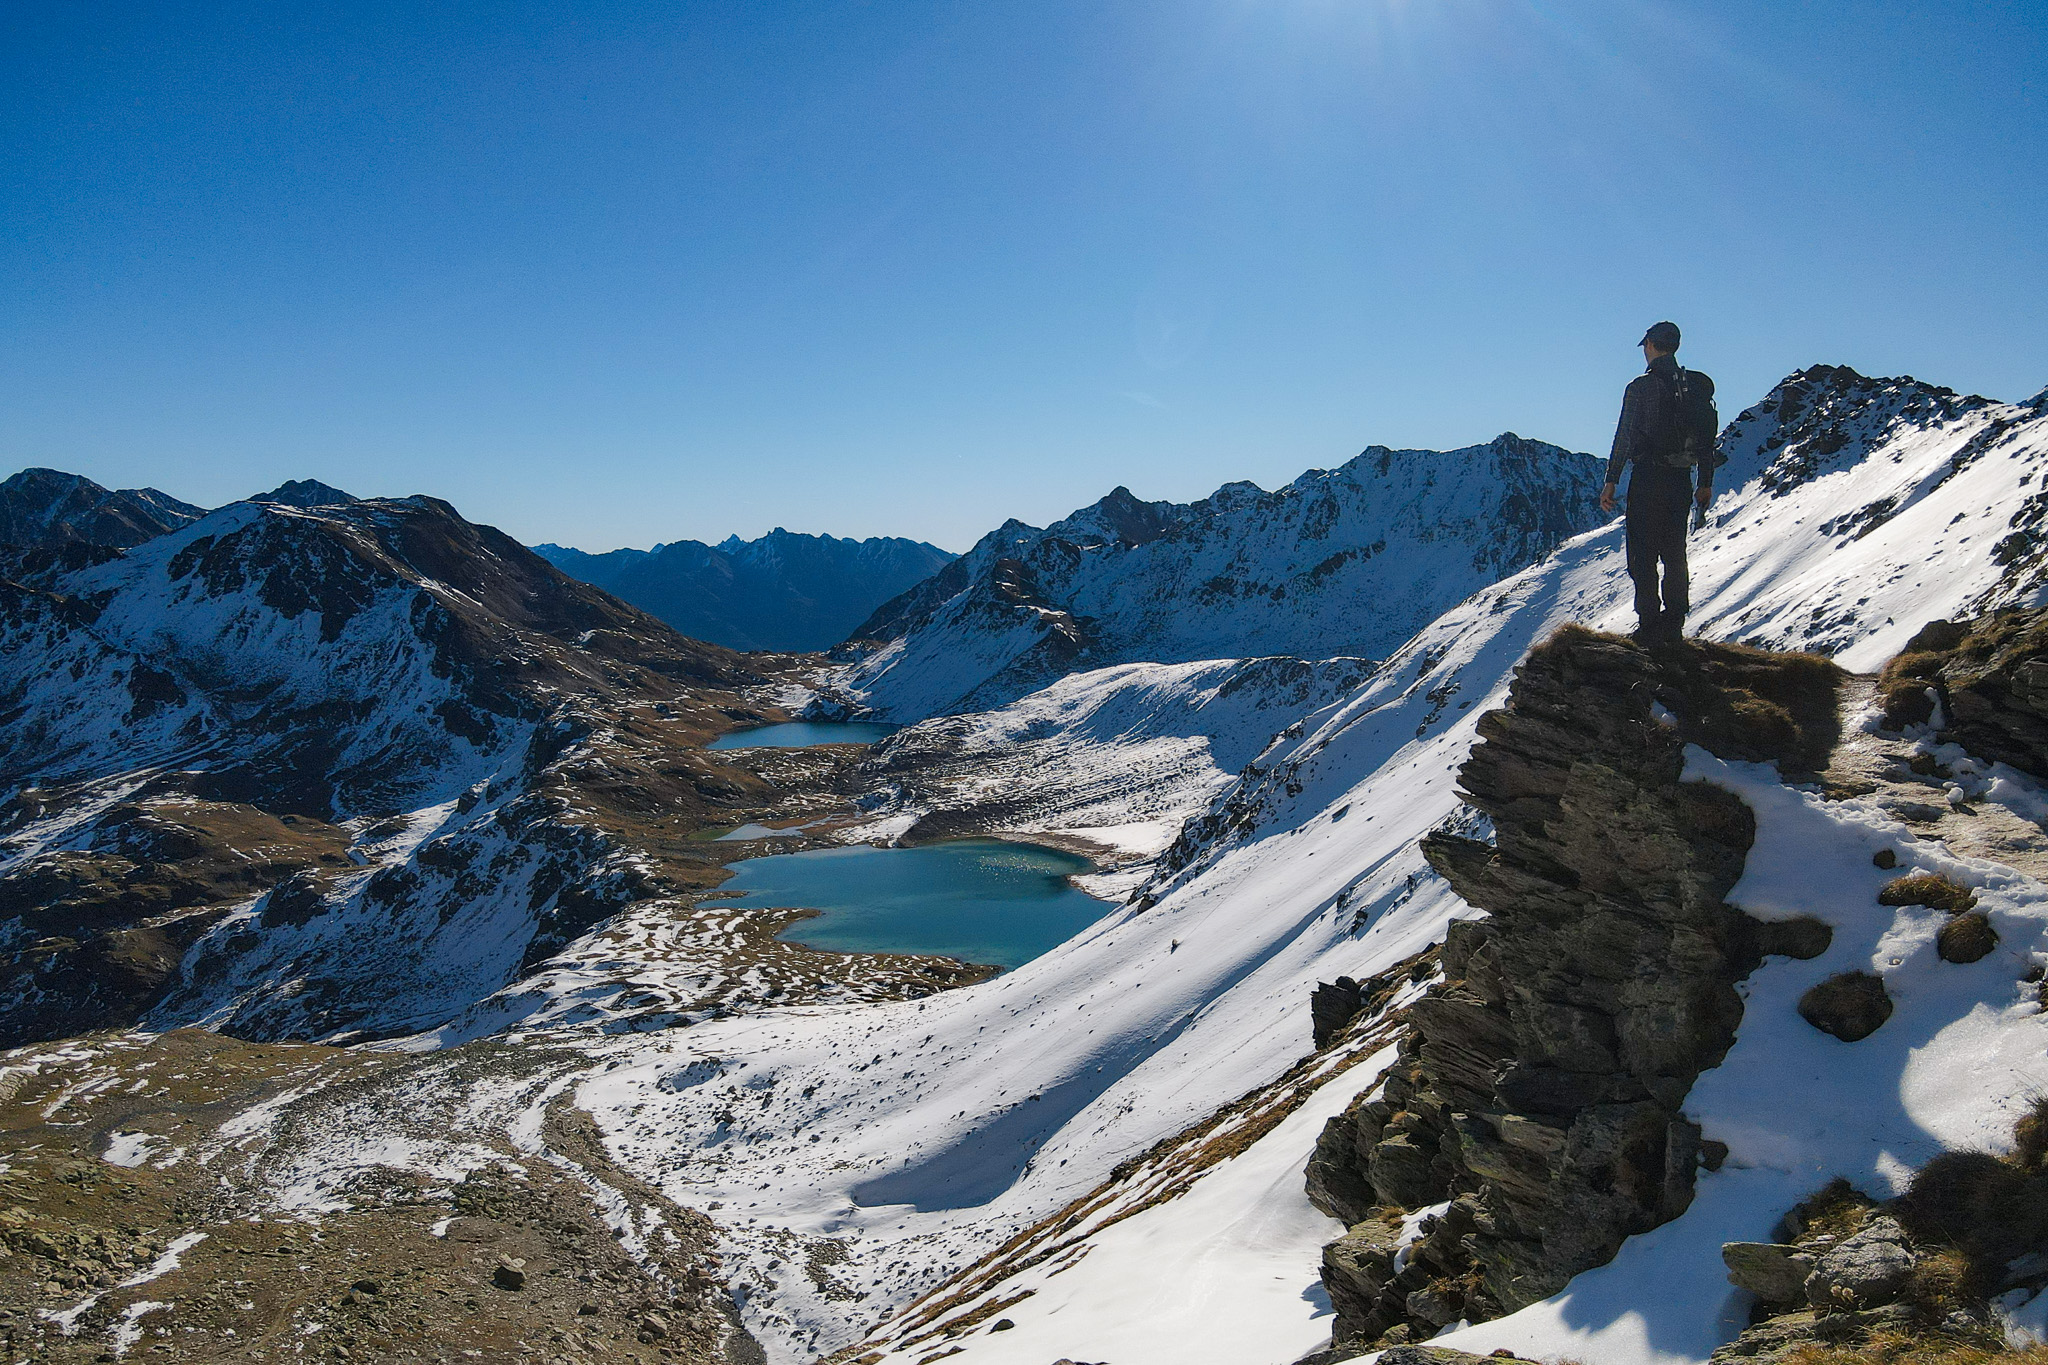
Jorifluelafurgga: The Epic Viewpoint
Assuming you walk in a clockwise direction, you’ll get your first glimpse of the Joriseen Lakes at around 3.7km. After a slow and steady ascent, you’ll finally reach Jorifluelafurgga. This spectacular high mountain pass offers the most extraordinary views of the lakes.
Without a doubt, reaching Jorifluelafurgga is the highlight of the Joriseen Hike.


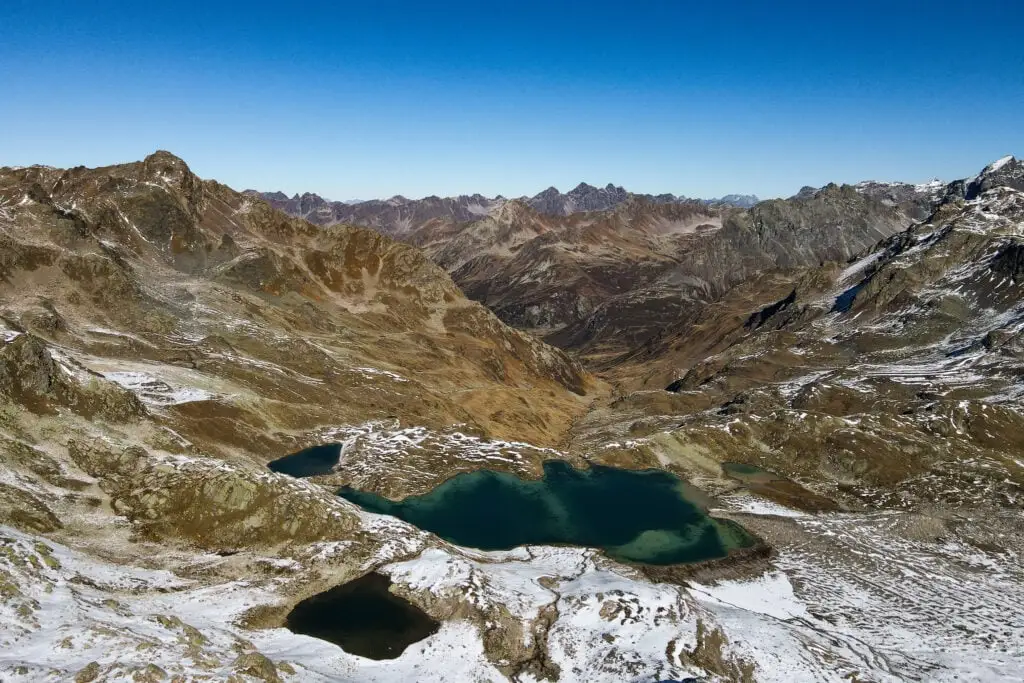
Once I’d taken in the incredible views, I decided to fly my drone. From the sky, I captured more of the area’s stunning mountainous landscape. Feel free to watch our Davos Hiking YouTube video for drone footage of the hike.


Optional Extension: Jorihorn Summit
From Jorifluelafurgga, you can also extend the walk to the summit of Jorihorn. Personally, I didn’t do this as I stuck to the traditional circular route. However, if you’re feeling energetic and adventurous, you may want to consider hiking to the peak of Jorihorn for even more breathtaking views.
Joriseen Lakes
Other than seeing the Joriseen Lakes from afar from Jorifluelafurgga, you’ll also get to walk alongside them. As you descend from Jorifluelafurgga towards the lakes, you’ll enjoy numerous superb vantage points of the lakes.
At different elevations, the sun strikes the lakes at slightly different angles. This creates many unique photo opportunities as you descend. Of course, I highly recommend doing this walk on a clear, sunny day, especially if you want the lakes to pop!
Whether you walk clockwise or anticlockwise, walking alongside the lakes marks a rough halfway point on the loop walk. Many people will stop by the lakes to have lunch. Refuelling by the alpine lakes is surely a highlight of anyone’s Joriseen Hike adventure.


Winterlucke Pass
After walking by the ‘Joriseen’ mountain sign, you’ll begin the ascent back towards Fluela Pass. Between Joriseen and the Fluela Pass is the Winterlucke Pass. At 2,787 metres above sea level, Winterlucke is yet another exquisite high mountain pass to enjoy along this hike.
You’ll certainly want to pause your hike at Winterlucke to soak in the alpine views. Alongside the viewpoint at Jorifluelafurgga and the relaxing spot beside Joriseen, Winterlucke is the other major highlight along this walk.


Whilst at Winterlucke, I decided to fly the drone once more. From Winterlucke, I flew the drone back towards Joriseen, capturing a unique perspective of the lakes.

Once you’ve completed the circular component of the route, you’ll once again enjoy views of Fluela Pass before completing the hike.
Joriseen Hike: Practical Tips
Above, we have already included some tips and tricks to improve your experience doing this hike. We’ll now touch upon a few other useful things to know about this hike. In addition, we’ll cover some basic details about what to wear and what to pack.
- The hike is well sign-posted. Generally, the trail is marked by the number 788. Of course, as mentioned, make sure you have your own map to aid navigation.
- Don’t expect to see the lake’s majestic colours without the sun. Make sure to visit on a clear, sunny day, if possible.
- Even in summer, there can be snow on the trail, especially around Winterlucke Pass. All year round, be prepared for a snowy and icy track. For this reason, I highly recommend using trekking poles and ice grips.
- This is a difficult mountain hike. You should only do this hike if you have proper hiking gear and experience in the mountains. By proper hiking gear, I mean hiking boots and appropriate layers, depending on the season and weather.
- Pack plenty of food and water to fuel your adventure.
- Arrive early or late to enjoy the hike during the golden hours at dawn or dusk. This will also help you to avoid the midday crowds.


Joriseen Hike FAQs
Below, we’ll cover some of the most common questions about the hike.


What Is the Joriseen Hike Difficulty?
It’s hard. Not only will you gain nearly 850 metres, but you may also be navigating snowy mountain terrain and conditions.
What Is the Joriseen Hike Distance?
The loop is approx. 11km.
Are There Amenities at Joriseen?
Other than a car park and bus stop at the trailhead, there are no amenities or facilities at the trailhead or en route.
Other Hikes in Davos Klosters
- The 10 Best Davos Hikes: Your Davos Klosters Hiking Guide
- Joriseen Hike, Davos: How to Visit the Epic Joriseen Lakes
- Madrisa Hike to Ratschenhorn (Ratschenflue): The Ultimate Guide
- Rinerhorn Summit Hike, Davos: Everything You Need to Know
- Davos Panoramaweg (Davos Panorama Trail) Hiking Guide
- Schiahorn Summit Hike, Davos: The Ultimate Hiking Guide
- Hike (Not Bike) the ‘Alps Epic Trail Davos’ From Jakobshorn to Sertig
- Sertig Waterfall (Ducan Waterfall): The Complete Visitor’s Guide
- Davosersee Rundweg (AKA Lake Davos Trail) – Visitor’s Guide


Where to Stay Nearby
The best nearby accommodation options are found in either Davos or Klosters. Compared with Klosters, Davos offers many more accommodation options. Despite having fewer options, Klosters oozes a more rustic Swiss skiing-village vibe. So, if you’re after a traditional stay, you may want to stay in Klosters.
Where We Stayed: Solaria
Beck and I chose to stay in Solaria, which is a quiet neighbouring town of Davos Dorf. Because we hired a car, we had more flexibility in choosing to stay in an area away from the hustle and bustle of Davos Dorf.
We opted for the Davos area rather than Klosters, as it offered a better base for our hiking trip of the area.
We had a fantastic stay at Serviced Apartments by Solaria. Given how expensive Switzerland is, we stayed in an apartment where we could do our own cooking. This self-catering apartment had a well-equipped kitchen and spacious dining area with mountain views. It really was a perfect base for the Joriseen Hike.
Serviced Apartments by Solaria


- Quieter area near Davos Dorf
- Large private parking area
- Balconies with mountain views
Leave a comment